Blog
Low Budget Screen Printing: A Newbies’ Guide
Hey designers, want way more inspiration? Attend our all-inclusive soul-fulfilling three-day design retreat, WMC: Off-The-Grid, this October 5 – 7th. To learn more, head to wmcfest.com.
When I first decided I wanted to to get into screen printing a few months ago, I really had no idea what was involved. I am an artist and I knew that I wanted to print my own designs but that was about it, so when I first started to look around for screens I went to my local art supply store and they were able to provide me with my first silk screen and a squeegee for a fair price. However, I recommend that you find a screen print wholesaler such as Catspit Productions, LLC. and deal with them directly. This way you will save yourself a whole lot of cash as well as tapping into the supply line for everything you will need.
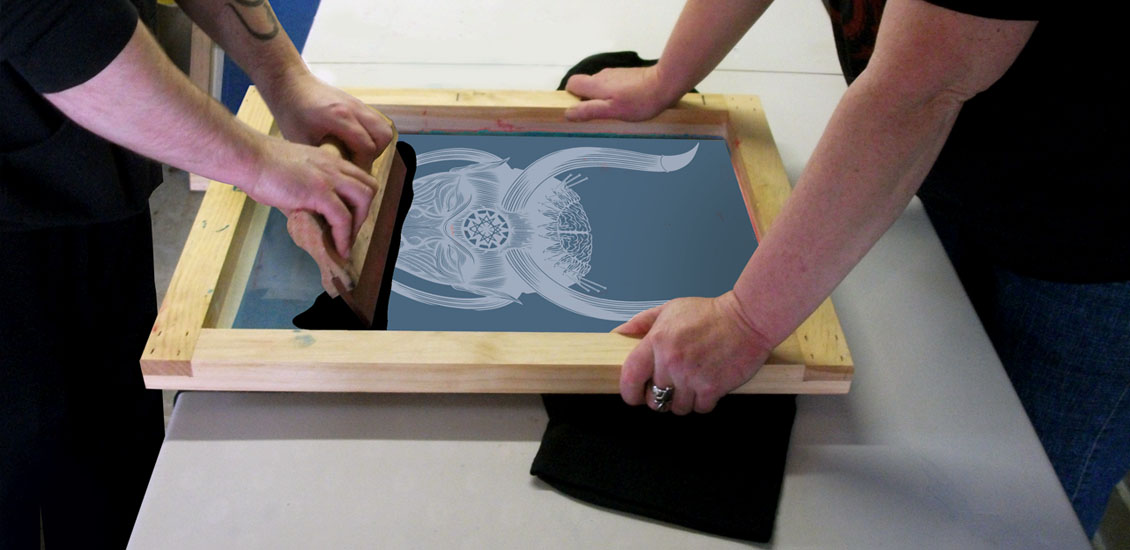
You can screen print without a carousel.
With the average cost of a screen printing carousel being between $1500 – $2500 I could not afford one to start out. Instead, get a friend to help hold the screen firmly in place while you use the squeegee to apply the ink to the screen then have them lift it away, it really is that easy. Just make sure the screen does not move while you’re printing. I use a flat piece of wood slipped inside the shirt to keep it flat and prevent ink from bleeding through to the black layer. A day may come when you are printing the volume to afford a carousel, but to begin with you can get by without one and save a whole bunch of money. As I am writing this I am running my entire operation off one trestle table with the help of a friend to hold the screen when I print, that’s it.

How to use photo emulsion on the cheap.
Photo emulsion is easy to use in the right conditions. To use your artwork on your screen as a stencil you will first need to coat the screen with a photo emulsion in total darkness, then dry it in total darkness until the emulsion sets, then finally you can place your artwork transparency onto the screen and expose it to light to make a stencil from your artwork.
Buy a darkroom safe light
The best way to work with the photo emulsion is in safe light conditions. A darkroom safe light lets you work with the photo emulsion in safe light conditions so that you can see what you’re doing when mixing the emulsion and coating the screen without exposing it to UV light (sunlight, light from light bulbs). Jump on eBay and find a Kodak darkroom safe light (or equivalent). With everything photographic moving to digital these days, safe lights are no longer in demand and you should be able to buy one for around $20 (I did).

Buy some photo emulsion and a scoop coater
You can buy this directly from your screen print supplier or on Amazon.
Coating the Screen
Turn off all other lights; plug in your safe light. You are now working in safe light conditions. Mix your photo emulsion as specified by the manufacturer. Poor the mixed emulsion into your scoop coater and use it to coat the underside of the screen.

Drying the screen
Now the screen needs to be left to dry face down in a dark place, where no light can reach it. Photo emulsion takes a while to dry so plan for safe light conditions to dry it for a few days away form daylight (or any other UV light). For months I used a large suitcase to store the screen in while it dried. I put some blocks in each end of the case to hold the screen away from the bottom and placed the screen inside face down, zipped up, and then covered the suitcase with a blanket to ensure no light entered and waited until it dried. In winter without heat applied this can take a week to dry properly. In summer it will dry much faster. If you can apply a low heat source (fan heater for example) it will dry much faster. Only check on the screen under safe light conditions and only expose your artwork when the photo emulsion is completely dry, it hardens. I recently got a new laptop to use with Photoshop, and have modified the cardboard box the laptop came in to use as a light safe box for drying photo emulsion coated screens in. It really can be as cheap and simple as a cardboard box well sealed with black duct tape. A few blocks in each end to keep the screen off the bottom, the lid closed up with a blanket thrown over it to make sure it is light safe.

Build a super low cost exposure unit:
If you want to buy a large vacuum sealing exposure unit it will cost from $999 – $2500. I couldn’t afford that, I still can’t. Here is how I expose my screens, its super cheap and easy.
Buy a lamp for an exposure unit for under $30.
Your local hardware supply store sells 500 watt halogen work-lights for around $30 (cheaper in USA). They generally have a black housing and clear glass lens at the front with a wire grill covering it. Start by removing the grill and glass from the front. It is a UV filter and when you expose your artwork to your screen you will want maximum UV exposure. If you have a shed, attach a piece of wood 32cm from the trestle table you will be exposing your screen on. I attached the wood with a hinge so I can fold the lamp up and away when not in use. If you don’t have access to the bare beams of a shed wall to rig up your exposure unit then use whatever is at hand. I have seen people use a guitar stand to hold the lamp the correct distance from the screen while it exposes (32cm).

Next you need to buy some foam rubber to fit under your screen. The idea here is that the foam is slightly deeper than the screen so that it pushes the screen up from the table when the screen in placed under the lamp face up.
Buy 3m of plain black cloth fabric. Cheap as chips. We will use some of this to cover our foam rubber and the rest will be used to cover the area under our screen when we expose it.
Wrap the foam in black fabric so that it is completely covered. I used liquid nails to attach the fabric to the screen as I cannot sew. As long as the foam is covered in the black plain cloth it will be fine.
Buy a piece of 1 quarter plate glass with 0 UV rating (or the lowest UV rating you can get so that it will let the maximum UV rays though possible). Measure it so that it is big enough to cover your artwork holding it down flat onto the screen. Slightly larger than the inside edge of the screen works fine. Have the edges of the glass sanded so that you can handle it safely without getting cut. Any glass supply store can do this for you.
And that is all the kit you need to get started. You will have some black fabric left over, when you are ready to expose your screen start by covering the table area with the remaining fabric.
How to expose a screen


For more useful information on screen printing check out Catspit Productions, LLC. Also I recommend reading Threads Not Dead, by Jeff Finley of Go Media for an in-depth look at apparel industry and how to launch your own clothing line. They even sell screen printing starter kits out there.
I got into this for the love of art and to earn some side income, chances are it’s the same for you to. Earning some cash along the way is good too. One day I hope to launch my own clothing line and go big time. In the mean time I try to simplify the print process so that it is manageable and affordable while I am still working a day job. I hope you have found some value in these methods.