Blog
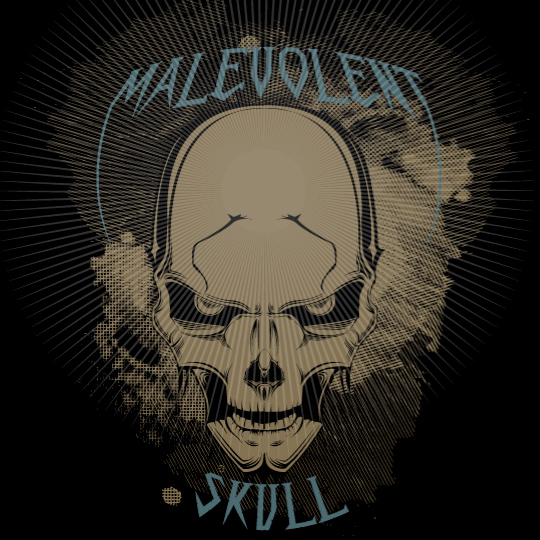
Illustrate a Malevolent Skull in 8 Steps
Introduction
I know that skulls have been slowly fading out of pop culture and seem to be passé, but I still love drawing them and coming up with new ideas and refreshing the design of that “same old skull thing”.
Keeping in mind that I am a horrible artist, and not a good designer. This tutorial is made for all the people like me.
Things you will learn:
In the tutorial I will go over how to create a cool looking malevolent skull that can be used for bands, t-shirts, or just vector art of your choosing.
Things you will need:
- Illustrator or other vector editing program
- I use a pen tablet, but it is not needed for this tutorial.
- You will also need a pact with satins minions (this is only needed if you wish to make your illustrations truly evil and malevolent).
Getting Started:
 1. First off, sketch out a skull and the idea that you want. You can scribble it out with a pen and scan it in or use Illustrator or Photoshop to draw out some basic ideas. Drawing skulls are pretty easy. Draw a oval and work from there. Eyes are situated half way down your oval. The nose is half the distance between the eyes and chin. The mouth is half the distance between nose and chin. Creating cheekbones that are sticking out will add the malevolent feel. If you don’t feel comfortable drawing one on your own you can always just base it off a picture.

Move into Illustrator
2. Move into Illustrator.
Document set up is really up to you. I like to make my drawing very large; this helps in illustrator when drawing with brushes. Drag a guide from the ruler and place it in the center of your drawing (command R). This is because we are only drawing one side of the artwork. Lock that layer and create a new one. The new layer is where you will start drawing.


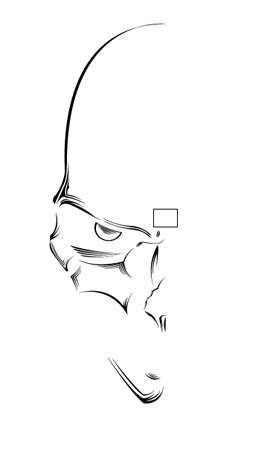
 3. Start tracing with the pen tool
Tap the letter (P) to use pen tool. Start at the guide in the center at the top of the drawing. Right click where you want to start, hold right click down to adjust the curve of the line at second point. Work your way down clicking and dragging to get the appropriate curvature of the line. Outline the entire skull and end at the bottom on the center guide.
I always start with the outside of the drawing and outline everything that I like. I embellished on some things, remember to have fun and experiment.
4. Build the interior Anatomy
I start with one side and work out all the dark spots. This will help with the high level of contrast we are looking for. Click on the top point that you started with and work from there. Try to mimic what you did down the skull till you hit the eye socket. Remember this is high contrast, so dark areas tend to blend with each other.
While making the outline remember to go into the dark areas that you think will mesh together such as the eye socket, cheek, and mouth. It should be one continuous drawing. Make sure when you click on the last point your pointer changes to show the closed path indicator. End where you ended the first time and this should complete your vector skull.
Take your time when you do this and make sure that you draw all the connecting dark spots. The more detail here will pay off in the end. You can get very detailed here but I want to just cover the basics. I usually switch a lot from preview mode to outline mode (command Y) so I can see what the design looks like without any distractions.
Keep in mind everything so far should be connected. This gives a high contrast feel to the drawing and enhances evil factor.
Remember that the majority of the drawing should be connected through the dark areas.
Once you have the outline done, you just need a few details like the nose and skull crack.
This just gives you a better idea of what I mean by connecting all the dark spots. Red areas are connect by “shadow” all the black areas are drawn after and cannot be connected, but still are dark.
5. Tidy up
Select everything (command A) and use the Add to shape area tool in the Pathfinder to join everything. Then copy in front (command C) then (command F) then tap the letter (O) to activate the reflect tool. Reflect will allow you to rotate the object and have a perfect mirror of what you have already done (do this while holding shift down to make it precise). Align the second half of your skull. Use Add to shape area tool in the Pathfinder again to join everything together and make it one object.
Now that we have a cool skull to work with, lets add some detail to it.

Adding Some Detail
 6. Adding contour lines. I like to make contour lines that follow the basic shapes I have already drawn. As shown here, it is really easy to just use the pen tool to play with shapes. Take your pen tool and click on a point near the cheek. Then another point down near the chin. Use your judgment on how many curves you want or the thickness of this line.
Add detail this way to create lines and curves with the pen tool to accent the face. Copy and paste it then re size it to create a shadowed effect.
Use this method in areas that you think would have shadows. Usually close to the dark areas around the eye socket nose and deep cheekbones.
Completed detail work without the dark original lines that we made.
I simply went around and added lines where I thought it would look good. Remember to experiment, if you don’t think it looks good delete it and try again.
7. Add highlights
After you are done adding the dark highlights you can use the same method in the dark areas with white.
8. Finishing up
After you are done adding the smaller detailed work all you will need to do from here is copy and mirror then align again, just as you did on the first half of the face.
I’ve added some halftones and radials from the Go Media Arsenal to polish the piece to completion.
If you like the way it came out and would like to add some color all you will need to do is use live paint.
That’s it, just remember to be creative and experiment with it.
Thanks for reading!
Nick Beaulieu
Graphic Designer
Design by Disorder